
It leaves no time to do other projects.
Here is an update about the bench top.
Last time I wrote already about gluing up the bench top and this week it was finally done.
Not everything went smooth. Let me give you some impressions.
As already mentioned my idea was to part the bench top into four pieces for easier handling. In order to make two halves out of it and finally to glue these two halves to one single piece.
 |
| Four quarters of the top |
The first three parts (quarters) went ok. As I was preparing the last beam for lamination, I noticed that it had developed a massive bow during the time I had stored it.
I have tried to find a way to use it anyway. But no chance. If I would have used it I would have about 5 mm difference in thickness on the top and the underside of the bench top. That would mean I had to correct 10 mm in thickness of the complete bench top.
As always, if one has word the question, one knows the answer already.
As always, if one has word the question, one knows the answer already.
So I decide to drive to the lumber dealer again and luckily I found a replacement.
I could rescue the fourth quarter part and go on with the build.
 |
| The last quarter with the new beam |
In contrast, to glue the quarters into halves worked pretty well. Just a few swipes with a jack so that the joint closed properly.
 |
| Two quarters glued up into a half |
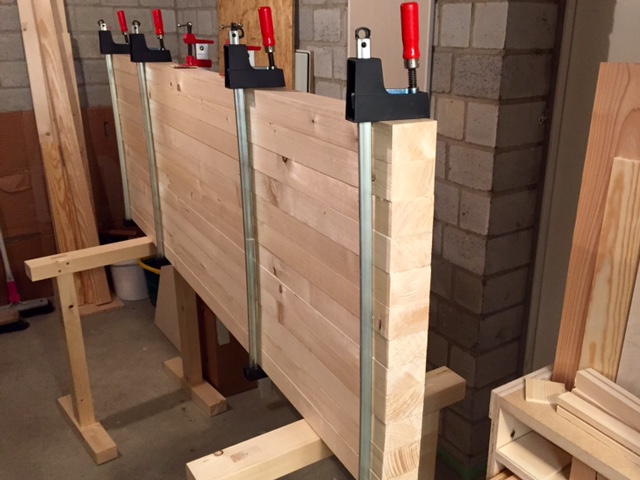
From now on it became unhandy. The two halves are already pretty heavy and the dimensions are not making it easier to handle them in my small shop space.
And the next "surprise" was waiting. The two halves won't fit. The joint is closed in the middle, but I've got gaps on both ends. Clamping pressure is not sufficient to close these gaps.
Alright, what to do know? Swearing like a trooper......ok....done. But no effect.
A sip of tea and thinking about. To glue up this two parts isn't different from laminating boards. I will need a spring joint.
That thought I started to plane a slight hollow in the middle. This was the solution. The two halves fitted together now pretty ok and so I glued up the last portions.
 |
| Final glue up |
Out of the clamps I've got a massive bench top now. With a hump on the top side and a remarkable hollow on the bottom side. $#%&.......
Now the saw donkeys can show whether they do their job.
The bench top is laying pretty stable on both. Additionally I secured the top with some clamps to the upper beam.
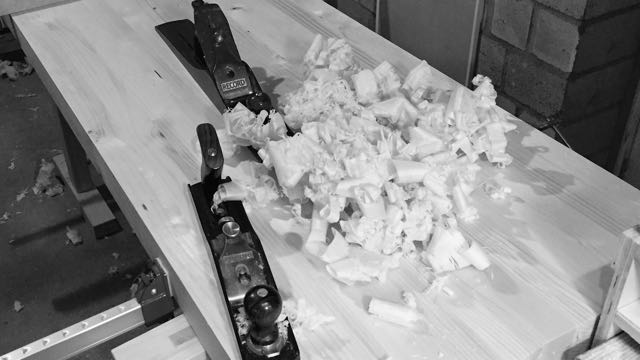
And now, happy shavings.
I've tried to follow Richard Maguire's advice to concentrate on the humps first. So I started planing across the grain at the highest points and worked them down.
I used my scrub plane but I couldn't do heavy shavings because in that case the whole construction started to rock.
It worked well with a shallow setting, but with a few more passes instead.
 |
| Removing high spots |
After a few passes I was down to flatness. Nearly. The last 50mm on the backside of the bench top is 2 mm lower than the rest.
At this point I switched technique and started to make shavings along the length.I grabbed the #7 and started planing.
After a few passes the shavings became longer and finally I achieved full shavings along the length of the board.
 |
| After a while of flattening |
Nevertheless the bench top isn't perfect yet. I will let it as it is for now and will do the final passes when the top is mounted to the bench.
All in all it was an exhausting and tiring job. And I still have to do the underside.
I need a break!
I'm glad about how the top came out. Even if the work is really exhausting and sometimes frustrating.
To get the top flat is not as easy as it sounds or looks like in all the videos out there. At the end it is manageable.
That was my woodwork the last days and weeks. Dimensioning lumber and laminating it into a top. And with the leftovers I have build some saw horses. By the way, the saw donkeys are working pretty well.
Stay tuned!
Stefan
Cheer up Stefan, the top is the biggest workout, the rest should be a cake walk :-)
ReplyDeleteBob
Hi Bob,
Deletea lot of cake is what I needed ;-)
I'm guess your are right. That's complaining on a high comfort level. The knowledge I have drawn out of it, is that it isn't as easy as it looks.
And the next bench top will be much easier ;-)
Cheers,
Stefan
Your saw donkeys look prettier than mine Stefan. The top is done but in hindsight did you consider gluing four 2x12's (2 together to make one board)and then face gluing them to make your top?
ReplyDeleteI feel your pain in flatting the top but think of the old guys that did this 12-14 hours a day, 6 days a week.
Hi Ralph,
Deletethanks for the praise of my saw donkeys. But they have their issues too. And I've learned a lot from your post so I was mindful while building them.
My very first idea was to laminate the top from countertop boards. That would have made it easier.
Unfortunately I've seen Richard's videos too late. That looks like a good solution but I had already bought the wood.
All in all I think I will manage it somehow. It's just the finding that it is a stiff piece of work.
Cheers,
Stefan
You said: "And I still have to do the underside."
ReplyDeleteWhy? As long as the areas that join to the frame are flat and square, why bother with the rest. No one will come to inspect. I promise! (and why remove strength?)
You'll soon have a very fine bench!
Hello Bob,
Deletemeanwhile this task is done. I was only shooting for flatness and not perfection. During the lamination I focused pretty much on the top side. Unfortunately nearly all of the beams moved a bit when I have clamped them.
So the underside came out pretty irregular.
I had no other choice than to treat the bottom.
Hope to get it together soon.
Cheers,
Stefan