
 Sometimes things do need much more time as estimated.
But the journey is the reward. Isn't it?
The build process of our new Mid-Century table is in the final stages.
After bringing the table top into it's final shape some finishing tasks were necessary.
- Removing pencil marks.
- Pre-finishing the top.
- Ease the edges.
- Glue-up the table frame.
The Table Top
After I cut and planed the top into shape there were a few tasks left. I had to remove all pencil marks and I had enough tear out on the top, which had to be removed.
I started to smooth the top with a #4. This went well for a large part. But no matter in which direction I was planing I had some serious tear out. So I came to the conclusion that scraping would be a better idea.
Scraper Preparation
That said I started to sharpen my scraper.
I think there are pretty good descriptions out there how to sharpen a scraper. But let me show you my procedure how to do it.
The first step I'm doing, is to remove the former hook and to prepare a clean edge.
Therefore I'm bringing both long edges of the scraper to my diamond stones. Starting on 400 grid and ending on 1200. Just doing a few strokes until you have a consistently straight and smooth edge.
 |
| Preparing the edge |
Then I'm laying the scraper flat on my 1200 grid stone and remove the remaining burr or rather the hook.
Again, just moving both faces back and forth on the stone until you can't feel any resistance with your fingertips any longer.
 |
| Removing the bur |
That's my whole preparation.
For burnishing I'm using the Veritas Variable Burnisher. I've bought it because I was inexperienced in that kind of work and I did not want to spent too much time into this skill.
For me it is working pretty well.
After I've prepared the edges of my scraper I clamp it into the vise. A piece of shelf liner helps so it will not slip.
 |
| Veritas Variable Burnisher |
After I've prepared the edges of my scraper I clamp it into the vise. A piece of shelf liner helps so it will not slip.
 |
| Prepared scraper |
Now I'm doing a few strokes with the burnisher with a zero degree angle set. This consolidates the material.
For the second pass I'm setting an angle between 5 and 8 degrees. Depending on how aggressive your scraper should be and which material you are dealing with.
 |
| Establishing a hook |
Again a few strokes and you are done. This time I've established a 5° angle at one edge and an 8° angle at the other one.
 |
| The established hook |
With the freshly sharpened scraper I started to treat the table top. I could remove most of the tear out.
 |
| Fine scraper shavings |
Unfortunately I couldn't remove the black line on the underside of the top (you remember, that happened during the glue up of the table top). I won't sweat it. This will never been seen again.
After I've done the top and the underside I have removed the pencil marks on the edge and smoothed it a bit. And then I've called it done.
The Frame Parts
As I was done with the table top I've treated all frame parts. Same procedure. Doing a few light strokes with a #4 and then scraped of the remaining marks.
 |
| Removing pencil marks |
After scraping all parts I've broken all sharp edges with a spoke shave.
 |
| Breaking the edges |
And here are all parts after preparation.
 |
| All prepared parts |
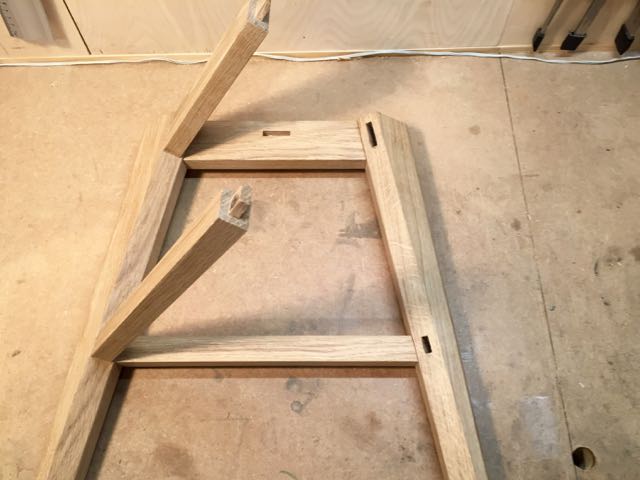
Now it's time to glue up the frame
Glue Up
As already described I had some glue up rehearsals. After doing it a few times I was still unsure how to proceed. All parts at one time, or gluing up in stages?
I did not found a way to clamp the table properly so I decided to glue up in stages.
That said the first stage was to glue two legs together, including the apron and the lower rail of course.
 |
| Ready for glue up |
It was easy going. I was using white glue this time, because my experience with hide glue was not that good.
Glue on the tenons and two beads into the mortice holes and putting pieces together. The hand and arm pressure was good enough to bring the parts properly together.
Anyway I have used the new band clamp to safeguard the pieces from falling apart.
 |
| Glue up stage 1 in the clamps |
I had a small gap on one side of the apron which I've closed with an additional clamp.
Concluding this was working well.
That done and the glue dried I was pretty satisfied with the result. No gaps at the apron but a tiny one at one side of the lower rail.
 |
| Glue up stage 1 |
 |
| A tiny gap |
Now I had to figure out the next stage of glue up. That was a bit tricky and I'm missing the words to describe it. Hopefully the picture makes it clear how I have done the second stage.
I wished I had one more hand, but finally it worked. Somehow.
 |
| Glue up stage 2 part 1 |
 |
| Glue up stage 2 part 2 |
On the picture you are seeing the dry run. I had to speed up during the glue up process so there was no time for picture taking. Only one so that you can see how I have used the glue.
 |
| Some glue on the tenon and a bead of glue at the mortise holes |
Bringing the pieces together went better than expected. The glue lubricated the mortice and tenons so that they were sliding easily into each other.
And I have added clamping pressure only at one point because the joint wouldn't stay close.
 |
| The frame glued and waiting for setting |
I gave the frame 24 hours to set.
Final Tasks
After the frame was set there were a few tasks to do. At first I had to fit the aprons, so that their top edge was flush in relation to the table top.
During the build I recognized that I have to bevel the top edge of the aprons, but I haven't done it.
So I have planed it down with a low angle jack at this stage.
 |
| View of the apron top edge |
That done I had to cut the legs to final length and to the right angle.
 |
| The needed length and angle marked |
Again it is a somehow weird compound angle :-)
A gent saw was my tool of choice to do this job.
 |
| Sawing the leg to final length |
 |
| Legs end after sawing |
And as with the top of the legs I had a strange tip after sawing. I cut it down with a chisel and a block plane.
Last but not least I have established a little bevel at the end of the legs so that they are protected against blow out or splintering.
 |
| Bevel at the legs end |
Drumroll
And now folks, here it is.
The underside looks already nice......
 |
| The underside |
But from the top it is even nicer....
 |
| Perspective A |
 |
| Perspective B |
And Now?
Phew, I can tell you that was a long way to go. Even for such a small table.
I will care about the finishing within the next days. My preferred method will be a water based wax varnish with a final coat of paste wax.
I'll give you an update on this as soon as done.
That's all folk!
Hope you enjoyed it. Let me know what do you think about it.
Stay tuned!
Stefan
Nice! All those angles makes a project like this complicated.
ReplyDeleteHi Brian,
Deletethanks.
Honestly I underestimated the degree of complexity a bit. Although I made some drawings before I started with the project the angles surprised me again and again.
Nice job Stefan, and i'll echo the comment by Brian, all those angles makes for lots of fun at glue up time :-) Bravo.
ReplyDeleteBob shop deprived for a while while Heather undergoes yet more radiations :-(
Hi Bob,
Deletethanks for your words. And you are totally right. I had a few glue up rehearsals and none of them saw to it that I feel safer. So I simply started and it went better than I thought. The secret was the glue. On one hand it made it easy to put the pieces together and on the other hand it fixed the parts nearly immediately.
Bob, I can not do more than to wish you all the best. My thoughts are with you.
Cheers,
Stefan
Stefan,
ReplyDeleteBeautiful table and if I remember correctly a quick build considering the complexity of the angled joints. When did you start, early Oct.? SWMBO wouldn't believe it if something came out of my shop looking that good and that fast.
Good on you,
ken
Hi Ken,
Deletethanks for praise. Honestly I started in April with prototyping. I had a second project during the summer and came back to the table in August. So it took a while :-)
It's far away from fast.
Cheers,
Stefan
It's amazing to me how something like this comes to together during the glue up. I think this is my favorite part of making things and yours looks like it went flawlessly.
ReplyDeleteBesides the finish, are there any plans to dye it or are you leaving it natural?
Hi Ralph,
Deletethanks for your words. It went surprisingly well even if I had some doubts.
About the color. Indeed I've thought about dyeing because the table should fit into our living room and the color of the other oak furniture is a bit more in the direction of yellow.
But it will be to experimental for me and I will leave it natural and just varnish it.
Cheers,
Stefan
Fantastic work! It is amazing how quickly the compexity increases as you move away from 90deg.
ReplyDeleteHi Greg,
Deletethanks a lot.
Well said, 90 deg. seems to be a piece of cake now.