
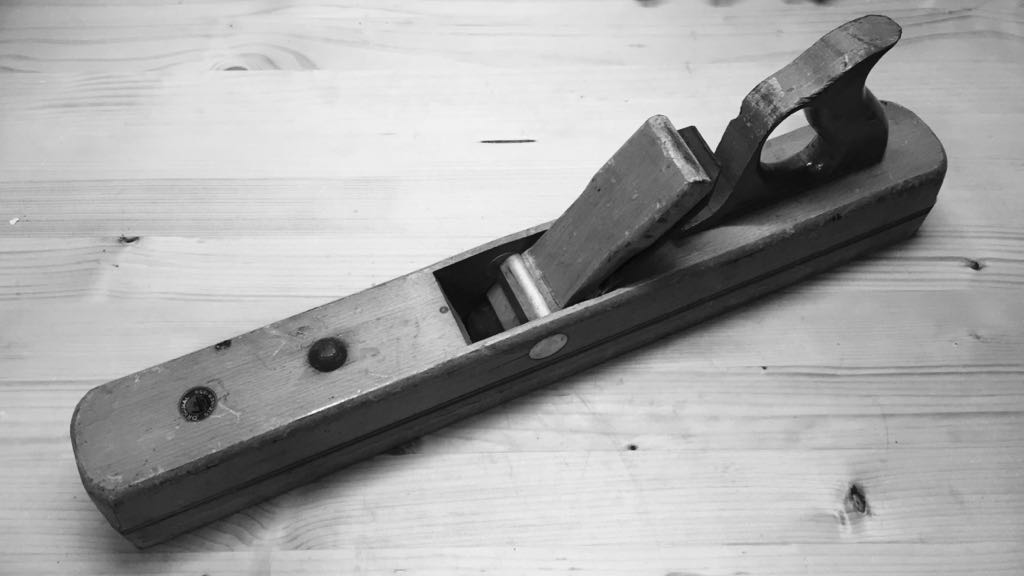
A longer while ago I have found a wooden short jointer plane at one of my flea market visits.
Somehow I didn't spent any time to care about it. Planing a wide board as a top panel caused me to recall.
Recently I wanted to plane the top for the upcoming phone bench flat. I grabbed the #5 and started to plane. After a short while I recognized that I'm already used to wooden planes.
So the short jointer came to my mind again. Unfortunately I haven't done much on the plane. Frankly the only thing I did was to true off the sole. Nevertheless I gave it a try. I simply inserted the iron from my wooden jack, set it and gave planing a try. What can I say? It kinda worked.
After a couple of strokes I recognized that the blade slipped black into the plane body. That means the wedge didn't fix the blade properly and I did not want to drive it in any further. The reason is that the plane body has got a crack where the wedge support sits.
I guess that someone drove the wedge in too hard at some point. That day I switched back to the #5. But it left me no peace. That being said, here comes what was inescapable.
First of all, this is the crack I'm talking about.....
 |
| Crack in plane body |
The crack is through, at least at the position of the opening. The first thing which came to my mind was to insert glue into the crack and to fill it with a little wedge.
 |
| Inserting glue |
So I filled the crack with wood glue and tried to spread the glue within the crack with a piece of paper. That done I've then inserted a thin wedge into the crack carefully and tried not to widen it.
The wedge looks a bit clunky on the pic. Of course I have prepared it before I have inserted it and made it thin on one edge. So it was more stable during the operation.
 |
| Wedge inserted |
I let the glue cure for a couple of minutes and then removed the remaining material.
 |
| Remaining material removed |
So, job done. Hmmm,....wait...what if the crack starts to wander? As these concerns were coming up I decided to add some epoxy in the remaning part of the split. As I have started to apply the epoxy it turned out that the crack was already longer than it was visible.
 |
| Applied epoxy |
There are good and not so good news. The good news are, that it was a good decision to add epoxy. I guess I could stop the crack from wandering. The not so good news are, that it still looks as it would be a crack.
 |
| After curing and scraping |
But it is not. The crack is filled and it's only the shadow which makes it look like it is.
As I don't want to win a price for the most beautiful plane, but it should become a daily user, I declared it done.
 |
| Another filled crack |
Because I was at it, I had a look at other possible defects. I found another split directly in the opposite. And filled it with epoxy too. Because that will be covered by the iron and the wedge it has not to look nice.
That done the next working area occurred. When I was inserting the wedge support I recognized that there is a gap now, which is kind of obvious. I'm not completely sure if that has got any influence. In the worst case the iron slips. Which leads into driving in the wedge deeper. Which leads into another split. So I thought it would be good to fix this too.
That done the next working area occurred. When I was inserting the wedge support I recognized that there is a gap now, which is kind of obvious. I'm not completely sure if that has got any influence. In the worst case the iron slips. Which leads into driving in the wedge deeper. Which leads into another split. So I thought it would be good to fix this too.
 |
| Gap with inserted wedge support |
I made a thick Beech shaving, like this....
 |
| Heavy shaving |
I cut a couple of piece off and spread some glue on....
 |
| Spread on glue |
And finally I laminated this pieces into the hole.
 |
| Glued it shavings |
Then I let it dry for a while and trimmed off the waste material. Finally a bit of filing and scraping and the wedge support is sitting tight again.
 |
| Defect handle |
And the last one which was bothering me, was this missing piece at the handle. I decided to glue on another piece of Beech too. Therefore I had to remove the clear coat first and then to cut out the defect so that I had a flat surface to glue on a piece of wood.
After cutting of all the waste material and some rough shaping it came out like this.
 |
| Exaggerated a bit with the glued on piece |
After cutting of all the waste material and some rough shaping it came out like this.
 |
| Defect filled with Beech |
After I had repaired all this issues I wanted to scrape of the clear coat from the complete body and then to refinish it. But this was the point where a heavy flu infection knocked me off my feet recently.
By the way, of course I have trued off the sole. That was already done a short while after I have bought the plane.
I'm often doing this to see, how bad it is and if it make sense to keep and restore a plane or to make spare parts out of it.
After all the above described treatments I only checked if the sole is still flat. All good so far.
Then over to the blade. I tell you what. This post is already much longer as I have planned to do it.
That said, I will report about the blade and the setting next time.
Let me know if there are any questions or proposals.
Stay tuned!
Stefan
Then over to the blade. I tell you what. This post is already much longer as I have planned to do it.
That said, I will report about the blade and the setting next time.
Let me know if there are any questions or proposals.
Stay tuned!
Stefan
Hi Stefan.
ReplyDeleteNice job on repairing the jointer.
I like it when it is a little visible, that a tool has been repaired, to me it is a sign that someone has cared for the tool and found that it was worth repairing.
Brgds
Jonas
Hi Jonas,
Deletethanks for saying.
Interesting point of view. But that's it. I've cared about it. Just so that it can become one of my daily users.
Cheers,
Stefan
Hi Stefan. I am guessing that the cracks could not be clamped closed so that you would only need glue and not a wedge. I thought if the cracks were open that the hole for the wedge support would be too big. Good job fixing that. I look forward to seeing more on this.
ReplyDeleteHi Matt,
Deleteyour assumption is quite right. I gave it a try, but there was no significant movement.
Then stay curious because there will by something about the iron too.
Cheers,
Stefan
Sehr schön gemacht. Was ist das für ein Fabrikat? Ulmia?
ReplyDeleteHallo Wolfram,
Deletedanke. Das ist ein Steiner.
I don't know if Blogger is eating up comments, but I have received another comment from Wolfram which is not shown here, for whatever reason.
ReplyDeleteSo, thanks Wolfram. And the manufacturer of the plane is "Steiner" which makes it looking pretty similar to Ulmia.
Cheers,
Stefan
SAtefan re your missing comments, check the Spam folder for comments, your dissapearing one, one day ended up there...
ReplyDeleteNice rehab, always good to see a tool being rescued
Bob
Hi Bob,
Deletethanks for your advice. I was kinda dull last week.
Men flu...you know what I mean....
I like pretty much to bring these kind of tools back to work.
Cheers,
Stefan