
 I had resolved not to write about sharpening.
There are specialist out there who do know everything about it.
I'm just a simple Internet woodworker.
In my last posts I have mentioned pretty often that I have changed my sharpening routine. Maybe once too often. So it came that Ken requested at my last post that I have to reveal the secret.
Now then, what have I changed? Good question.
But let me start right from the beginning.
Earlier this year Helen and Richard from The English Woodworker came out with their new video series about sharpening. I hesitated to sign up for the series. My first thought was, no not again something about sharpening. Sharpening is for me just a necessary evil and not a passion.
But I was curious. I have seen all other videos of both and I must admit I am a fan. Richard is so down to earth and it is always fun to watch his videos. So I bought the series.
After watching part one I was not really convinced. But part two made the change.
Richard explained in this part how to sharpen plane blades by hand. He showed the procedure with different steels on different setups. What's so exciting about it? Well, he addressed all issues I had with sharpening in this one video. Not that I haven't seen all the others out there. I don't know how often I have seen Mr. Sellers videos about the same topic. And until today I stuck to his method.
But seen Richard's video made it clear to me that I have to change my routine. So I decided to give it a try the very next time in the shop.
Actually I'm sharpening on three diamond stones. I've got three plates 400, 600 and 1000 grit. Additionally I have 150 and 220 grit for rough and fast material removal.
All in all I would say my irons had been sharp. But you know, I was always missing that extra push over the cliff. I mean your amp should go to eleven which will be one louder (attention! competition- name the movie).
I was standing in the shop and thinking about what to do. So I took out my sharpening board, removed the blade out of my wooden jack. As I didn't saw any advantage in having a secondary bevel I have sharpened my blades over the whole bevel surface at 25°. That was a good starting point.
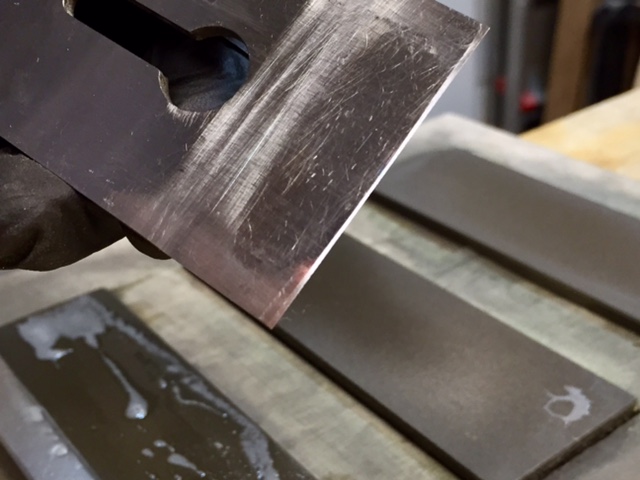
First of all I decide to give freehand sharpening another chance. Having the whole bevel at 25° made it easy to register the blade. And then I started carefully to move the blade back and forth, always watching that the bevel stayed registered to the stone. That was a bit awkward the first times, but trust me it's getting better form sharpening to sharpening.
 |
| Freehand sharpening at 25° |
I repeated this motion until I recognized a slight burr. Now I followed again Richard's advise and tilted the iron a tad forward.
 |
| Tilting the blade forward |
I have counted the strokes. Only 7 to 8. Then I recognized a significant burr at the back side.
 |
| Burr at the back |
I repeated this procedure on the two other stones. Finally I flipped over the blade to remove the burr from the mirror side of the blade on the super fine stone.
 |
| Burr removed |
Richard explains in the video that you can tilt the iron at this stage too. As I wanted to have a repeatable result I have used the ruler trick for this.
Now you can ask what is magical with that? Maybe nothing, most probably it was just the lack of realization.
This time my blade edge felt different - very different.
Now, having licked blood, I wanted to know how the strop influences the result.
I have loaded the strop freshly with compound and started stropping. Close to Richard's explanations.
But wait, what's this? It was the first time that stropping the bevel and secondary bevel removed the burr in this way. I could watch how this fine amount of metal became loose.
 |
| Getting rid of the burr on the strop |
I think you can see it much better on this blade....
 |
| The burr is going to be removed |
I have maintained front and back bevel and was rewarded with two shiny surfaces.
But not only the bevels have been shiny. The blade edge looked different.
The moment of truth was coming closer. I have mounted the blade back into the plane and set it.
I have always a batten at hand to set my plane. I clamped it into the vise and started the first stroke.
And this guys, was my moment of enlightenment. Never ever before the plane slid so smooth over the wood.
I had to readjust the plane blade. And with the second stroke I had full width shavings in a flimsiness I never had before.
You know what? I had planed down the batten just for fun this evening. And saying down means down.
Okay, lets have a look at the results this time.
 |
| Shooting the end of a rail of the garden bench |
 |
| End grain shavings |
 |
| End of the rail after shooting it |
So, that's the first part of changing my sharpening procedure.
As already mentioned, maybe it was clear for the most of you, or it was obvious what I have done wrong.
For me this was a huge step forward. You know, I didn't had the impression that my edges are not sharp.
Conclusion
So what exactly has changed?
- Sharpening freehand - I'm trying not to use a honing guide.
- Bringing back the primary bevel to 25° every time I sharpen.
- Establishing a secondary bevel with only a few strokes on the stone.
- Honing on the strop until the burr comes off.
And this is only changing of the procedure. No other tools or materials are used.
But as I'm writing this, I'm waiting for my order of a Norton oil stone. I will give it a try and see how that will work for me.
What's About The Actual Project?
It's going forward. I'm at the stage that making pictures is becoming awkward. Means I'm working at the front and back rails.
As I was preparing the stock for the pieces this week I had another sharpening session. So I thought I could report about it.
Making front and back rails is not different from making side rails. Just longer.
 |
| The Garden Bench with front and back rails |
Actually I'm caring about the crest rail. And then I guess the arm rests are next.
That's it for this week.
Stay tuned!
Stefan
Stefan,
ReplyDeleteI suspected as much. I can't recommend Richard's videos enough. While most sharpening videos go through the basics of sharpening....Rub the iron on stones of decreasing grit size until the iron is "sharp". Richard, like good instructors whatever the field, goes to "first principals", making no assumptions as to a person's knowledge base and does it without being condescending.
My greatest value from the videos was just conformation that the things I had learned over years of trial and error sharping iron were correct. I have long suspected that stropping no only polished the cutting edge but at the same time it was slightly dubbing the edge made it stronger and longer lasting.
Anyway congrats on getting to the next level of sharp iron.
BTW, I also picked up some ideas on A2 and thick irons. They may no longer be the devil in the shape of plane irons, I still do not like A2 but at least I have some idea as to how to live with it when needed.
ken
Hi Ken,
Deleteyeah. Nothing fancy from my side. I'm simply glad that I could achieve another sharpness level. As mentioned, maybe it is just the realization.
But paring with chisels is working much better now and the oil stone is waiting for getting tested.
Take care,
Stefan
Hi Stefan!
ReplyDeleteCan you report when you get the Norton Stone as well?
Thanks
Olá António,
Deleteyes I will. The stone arrived already ;-)
And I think I will have a post about my oil stone adventure.
Cheers,
Stefan
Congrats Stefan
ReplyDeleteSharpening is such a fundamental gateway skill, however you achieved sharpening nirvana, does not matters, it is the end results.
After all the talks from Ken, Ralph and now you, i broke down and bought the series from Richard. Did not really learn anything new, but it reinforced what i do and why. I agreed that Richard is a good teacher. Bought also the spoon rack series, will give that a try.
Bob, who learned sharpening from my carving club's days. stop and strop often
Hi Bob,
Deletesorry for the late reply. But sometimes life gets in your way.
Thanks. For me it stands in the way a while because I just wanted to build.
But I feel more and more comfortable with it.
The Spoon Rack series is really nice. Hope you enjoyed it.
I was asking myself what to do with a Spoon Rack. If you look at it for a while you may recognize that it could be a nice saw rack. With some modifications of course.
All best,
Stefan
Good stuff, Stefan. Looking forward to hear what you think about the oil stone.
ReplyDeleteHi Matt,
Deletemy apologizes to you too. Thanks for your words.
Yeah, I will report about my oil stone experiences.
Cheers,
Stefan
Why hasn't anyone pointed out your movie reference and sung "Stonehenge" yet? Or asked you to smell the glove?
ReplyDeleteHi there,
DeleteI was asking myself already. Maybe the readers are not so "Wood'n'Roll".
Great that you figured it out.
Cheers,
Stefan