

After understanding sightlines and resulting angles I was ready to make the next steps.
Making a new seat plank, drilling and reaming the mortices and finally go over to the legs.
Man, what a discussion in my last week's post.
From my point of view the discussion was productive and meaningful.
So we know, that the resulting angle is the ratio between splay and rake and if it is calculated by just using the Pythagorean theorem then there will be a mathematical error which is getting bigger with wider angles.
I guess that is a pragmatic conclusion.
So calculating my resulting angles will work with the mentioned method and I can live with an error of 0.5 degrees.
Nevertheless I've double checked that calculation with the sight line ruler and it's near to what I have calculated. Depending on wearing the right glasses and using the right pencil. 8-)
Broomsticks Are Helpful
The question was how to proceed now. Laying out and drilling the leg mortices first? Or making the legs first and trying out the new resulting angles in the toasted seat plank?
I opted for another procedure. For sure I will need the legs, so I started to make them. On the other side I would like to know if all the stuff I figured out now will give me the desired result.
So I laid out the mortise positions and the sight lines once again. Just to be sure. And then I made two substitute "legs".
Looking for some round material a while ago I found a nice and cheap broomstick.
 |
| Broomstick |
I cut two pieces to length and then cut the tenon with the tapered tenon cutter.
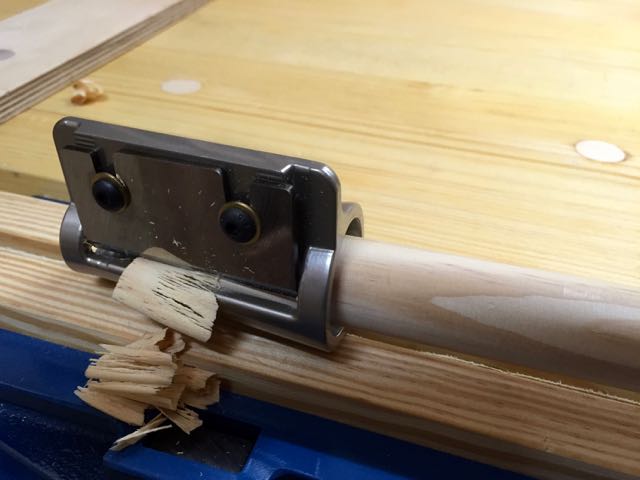 |
| Cutting tapered tenons |
These two sticks will allow me to check the mortice holes. First thing I have checked was the positioning and the hole angles. That looks good already. It's somehow that what I have in mind.
 |
| Checking the leg positioning |
 |
| Checking if the legs are in line |
Additionally these two stick will help to check the reaming of the mortices. Because the sticks are straight, in opposite to the legs which are tapered, it is possible to lean the adjustable bevel against it to check the angle during the reaming process.
Reaming The Leg Mortices
Next was to ream the leg mortices. That's straight forward. I inserted the reamer into a brace and reamed the holes. Carefully, only two to three turns. My plank is not pretty thick so you will be done pretty quick.
 |
| Reaming |
 |
| Checking |
After a few turns I double checked the mortices with my substitute legs.
When I was through wide enough I stopped the process and finally checked my splay and rake angle.
 |
| Splay angle of about 7° |
 |
| Rake angle of about 10° |
I'm pretty close to the angles I had in mind. I've seen the Chris Schwarz video about building stick legged chairs these days and he mentioned that he even did not care about 1° discrepancy.
Making The Legs
The mid-century chairs and stools I've got in mind and which are my design template have cigar shaped legs.
Pretty clear lines and I think easy to make with just hand tools.
That said I've made some blanks which are 30 x 30 mm and about 500 mm long.
In the first step I've marked a 20 mm circle in the center of every end.
 |
| Making a circle and marking the outsides of the circle |
The outer edges of the circle were transferred to the leg faces. As I would like to have a cigar shape I have laid out the thicker portion of the leg coming in about 100 mm from the leg's top. Now the marks of the ends have been connected to the ticker middle part. That gave me the shape of my leg taper.
 |
| Transferring the lines from the end to the faces |
And now - happy shavings. I've thought about what would be the best way to taper the legs. Finally a #5 did the job just fine.
The first opposite sides done, I've transferred the layout marks to the remaining sides and planed them down too.
 |
| First two sides tapered |
 |
| Second two sides done |
Now I've got the basic leg shape. Next step is to transform the legs from square to octagonal.
 |
| Basic leg shape |
Therefore I've transferred quarters of the circle marks onto the faces. I guess the picture makes it more clear.
 |
| Laying out the octagon |
The marked portions have to be removed now. I do not have a draw knife and it was just a click away.
Sometimes it's better to think twice and not to follow your gut feeling immediately. That means I have done all the work with a spoke shave. Fortunately I've got two of them so I could work with two different settings without adjusting the blade all the time.
 |
| Rough shaping |
The rough work done I could start to round over. Again the spoke shave came to task, with a shallow setting.
 |
| Refining the shape |
I've ensured not to cut under the measurement of the leg ends.
From this point on I used the tenon cutter to shape the top of the leg. Just a few careful turns so that I have a tenon was 40 mm long. That's the amount of material I need to come through the plank and to have a bit of stick out at the top.
Finding a Working Procedure
I have to find a better structured procedure to make this stool, respectively a chair in the future. Actually I'm jumping forth and back trough the tasks. Most properly that is because I was struggling with sight lines and resulting angles for a while.
 |
| Seat plank and first leg |
Now with the mortices in place and the first leg done most of the uncertainty is gone and I can go on more easily.
I looks like it will become a stool.
Stay tuned!
Stefan
Using the untapered dowel to check your angle is a great idea!
ReplyDeleteHi Derek,
Deletethanks. Initially not mine but it's a real big help.
Cheers,
Stefan
Looks like you have got it figured out. I'm looking forward to seeing this one put together.
ReplyDeleteHi Greg,
Deleteyes seems so. With a little help from some woodworking enthusiasts....
Talk soon,
Stefan
Really fascinating post, Stefan. Thanks. Makes me want to get a reamer and tapering tool.
ReplyDeleteHi Matt,
Deletethanks for your words.
Oh I won't like to be guilty about your tool wishes :-))
But both tools are nice to work with. I thought a while about alternatives. Finally I didn't regret that I've invested the money. Makes the process really easy.
Cheers,
Stefan
I think I finally got it. It is a compound angle - I was getting hung up on the names of them.
ReplyDeleteHi Ralph,
DeleteI think I was too silly with my answer in my last post. Yes of course in the result this are compound angles. I struggled a while too, to sort all the names and terms to get my own picture of it.
Cheers,
Stefan